 We would hope that you don’t find the job of recording your results in CASPA a difficult or time-consuming one. We would usually expect that if you find it a chore because it takes a long time, CASPA has other options that would make it easier for you.
This article aims to highlight the various approaches to recording results in CASPA plus a few hints and tips to set you on your way.
Pre-flight checks
We are constantly improving CASPA, so it is well worth ensuring you are always running the lastest version. If CASPA is telling you that a Check for updates is due, try and let the update go ahead. If you’re not able to update/install software, locate a colleague who can so that you remain up to date. At the time of writing (May 2012) you must use CASPA 2012 to record your summer 2012 assessments. Check your build of CASPA via the menu option Help | About. The current build is 1.2.2.0.
You’re going to want to record results for all of the pupils who are on roll, so all of your pupils must exist in CASPA. And the analysis you then carry out should be based on up to date information about the pupil (name, date of birth, entitlement to Free School Meals, etc). All of this basic pupil data comes from your school MIS. Make sure you have refreshed CASPA from your school MIS very recently. If you need a quick reminder about how to do this, go to the Help menu. Under guidance notes, you see near the top of the list, a document describing how to transfer basic pupil data for your MIS type (SIMS, MIS other than SIMS, or for those with no formal MIS)
OK. You’re ready to go!
 To import… or to enter manually?
So, what is the easiest way to get your end of year assessments into CASPA? If you’ve already recorded them electronically, this is usually a very easy decision – import them into CASPA. As a matter of principle, transferring them electronically will almost always be quicker and will be more accurate since re-keying the data will inevitably allow an error to creep in at some point.
Exporting and importing can sometimes seem daunting, and you are trusting to IT systems to get it right, but it is definitely the right decision; we put a lot of effort into making this as much a non-techie activity as we can and to put you in control over the decisions made during import. CASPA gives choices about how much data you import, and you get to review a report of the data to be imported before it is imported. What’s more, CASPA users have been importing data this way for years so it is a reliable mechanism.
We would therefore hope that you do not need to enter results into CASPA manually unless you hold them on paper or have them stored in an IT system that cannot export them (eg a Word document).
What are my options for importing my results then?
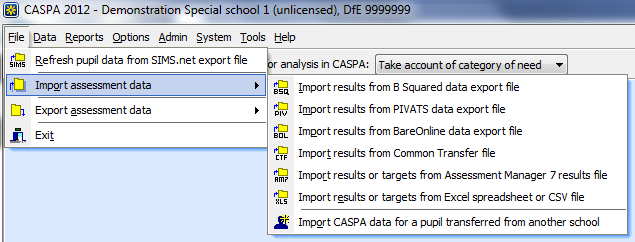
We offer six different import routes, some system specific and some generic. Your import options look like this when selecting File | Import assessment data…

The first three above are system-specific which allows CASPA to be certain about the scoring scheme used so it can convert the data into CASPA levels reliably during import. The import from CTF will include just whole levels so the conversion is also straightforward.
The last two, SIMS AM7 and Excel/CSV, are very different as you can use any scoring scheme you like and can create your own subject naming. For these two import routes CASPA provides an import wizard to guide you through mapping the subjects in the AM7, Excel or CSV file to the subjects in CASPA, and the scores to CASPA levels. You can even save these mappings so that if you need to import from the same source again, you don’t need to map those subjects/scores again.
So if you’re using B Squared or PIVATS electronically, we’d recommend using the menu options for these systems – don’t import as an Excel file as this will add work where it is not likely to be necessary.
And if you don’t hold your results electronically, don’t enter them into a spreadsheet in order to import into CASPA; it is an unnecessary step. Enter them directly in CASPA as CASPA has validation, that will not exist in a normal spreadsheet, to reduce the chance of dodgy data (eg P Scales for Handling Data) being recorded.
 CASPA contains detailed guidance notes to walk you through the import. So if it is your first time, or it has been a little while, go to Help | Guidance notes to find a guidance note specific to the import source. For B Squared and PIVATS users, there are also conversion tables under Help | Reference if you want confirmation of the way levels are converted during import.
Manual entry
We don’t treat manual entry as the poor relation – although we want to avoid re-keying data that has already been entred into an IT systems already. If you need to, or prefer to, record results manually, CASPA has features to help you do this as efficiently as possible.
Firstly, if you normally import from B Squared, PIVATS or use the BAREonline import, the results fields on the main data entry pages will be read-only. This prevents users from accidentally updating the results in CASPA and then over-writing them when next importing. If you really do mean to enter results manually and will not be importing as before, you will need to go to Options | CASPA configuration options and amend the External data source options (right-hand tab).
When updating existing data, you will want to keep track of which results are updated with summer term assessments and which are not. CASPA’s colour-coding will help here. Take a look at a previous article that covered colour-coding, scrolling down to the bottom where you will find colour-coding illustrated.
And CASPA caters for the typists and mouse-jockeys amongst you:
- If you prefer to use a mouse, you can click on a result field and select a level from the drop-down menu
- Right-click options include copying results for subjects where the same level applies, or for pupils working at a level for which the results are not subject-specific. Right-click on the Reading result to copy the Reading results to eiher all subjects or just the other Language and Literacy strands/aspects (try right-clicking Number, Scientific Enquiry and Art & Design for similar options)
- For typists, click on the first field and start typing the level – CASPA will start selecting the level and you can either complete the typing or use the arrow keys to go up or down the list.
- Tab to the next subject and continue. Normally the tabbing order is vertically (eg from Reading result to Writing result to Speaking result, etc) but if you want to add targets at the same time and want to tab horizontally, change this configuration setting via Options | CASPA configuration options
